How to Register Your School
Last updated: Apr 05, 2025
Registering Your School Account
This guide provides a step-by-step walkthrough of the Oraion school registration process. Follow these instructions to create your school's account and set up the initial administrative user.
The registration process uses a simple multi-step wizard to collect essential information about your school and create the primary administrator account. Based on your selections during registration, Oraion can automatically set up foundational academic structures like classes and subjects, and even activate your initial free trial subscription if you selected a plan beforehand.
Before you start, it might be helpful to have the following information ready:
- Official School Name and Contact Details (Email, Phone, Address)
- School Type (e.g., Nursery, Primary, Secondary) and Ownership Type (e.g., Private, Public)
- Primary Administrator's Full Name and Email Address
- A secure password for the administrator account
- (Optional) School Logo file (e.g., JPG, PNG)
- (Optional) School Theme Colors (Primary, Secondary, Accent)
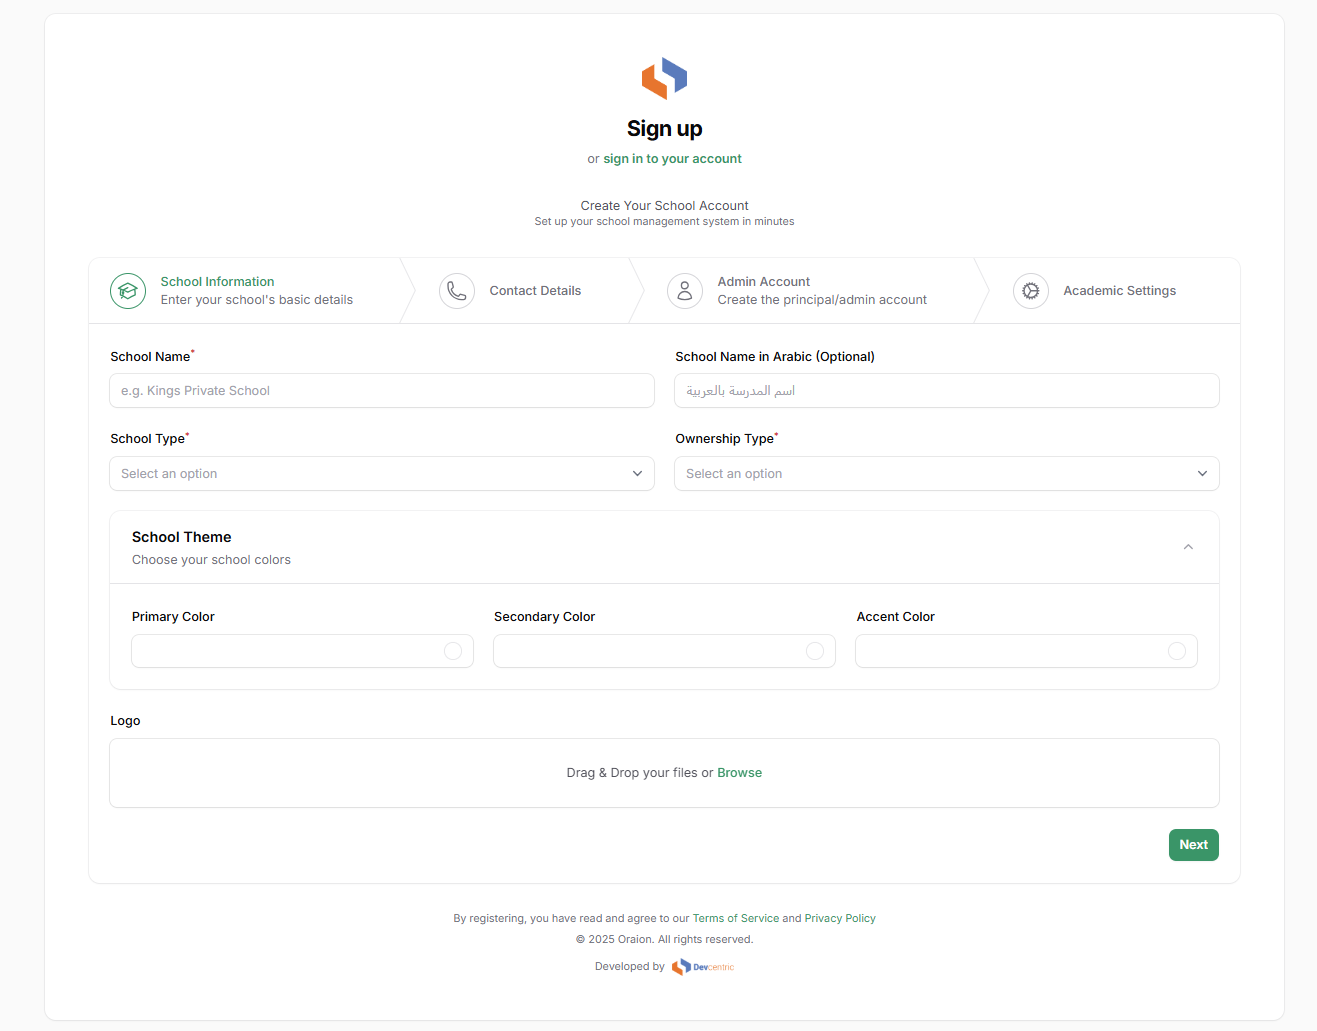
Step 1: School Information
This step collects basic details about your institution.
- School Name*: Enter the official name of your school.
- School Name in Arabic (Optional): Enter the school name in Arabic if applicable.
- School Type*: Select the type that best describes your school (e.g., Nursery & Primary, Secondary Only) from the dropdown menu.
- Ownership Type*: Select the ownership structure (e.g., Private, Public) from the dropdown menu.
- (Optional) School Theme: Click to expand this section. You can choose custom colors for your school's portal interface using the color pickers for Primary, Secondary, and Accent colors.
- (Optional) Logo: Drag & Drop your school's logo file onto the designated area, or click Browse to upload it.
- Click Next.
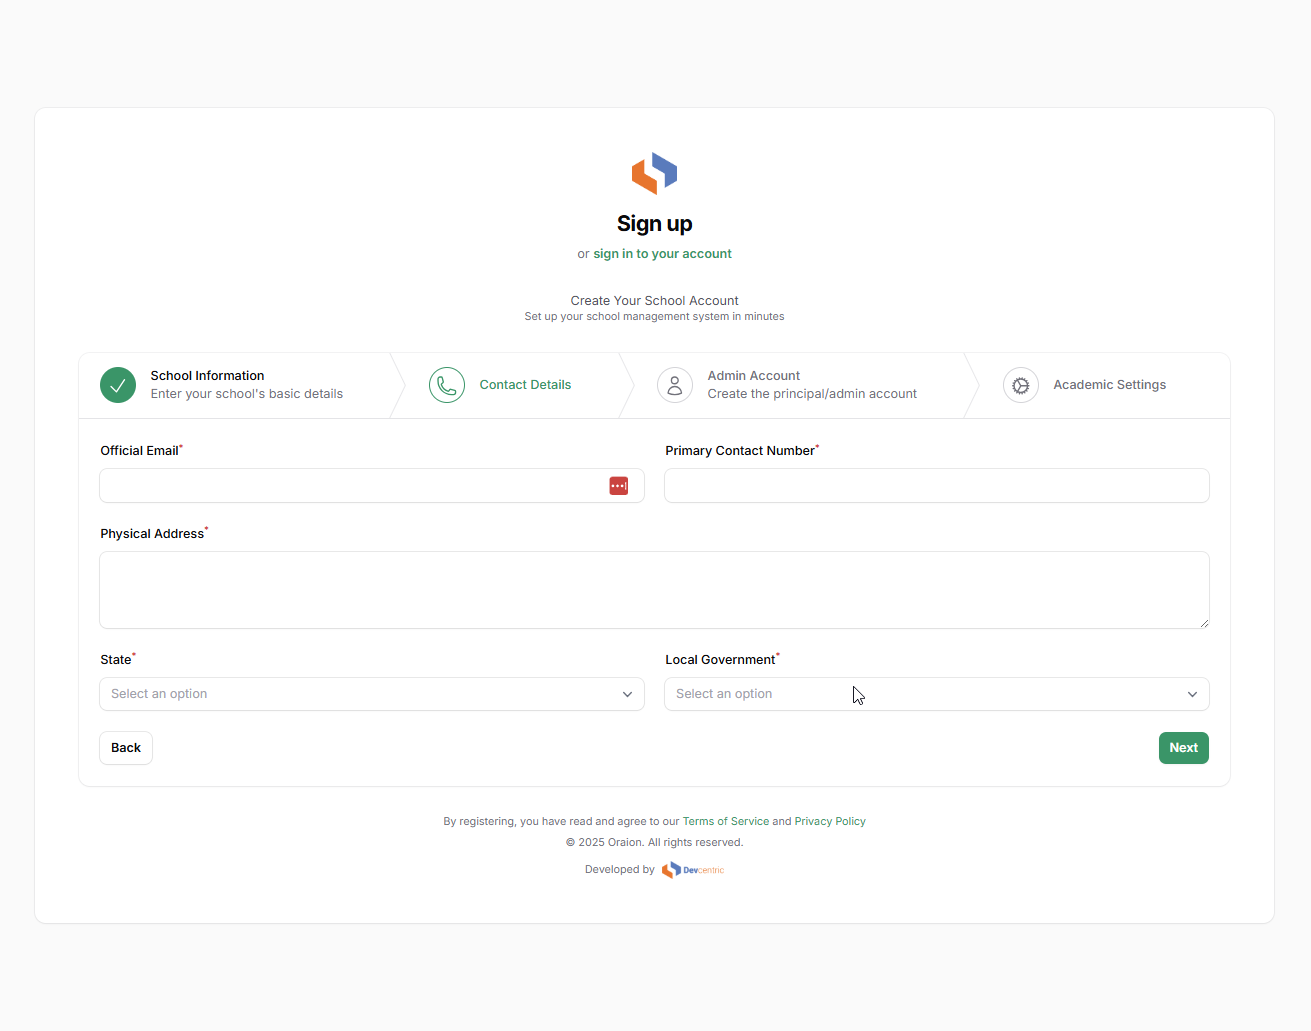
Step 2: Contact Details
Enter the official contact information for the school.
- Official Email*: Enter the primary email address for school communications.
- Primary Contact Number*: Enter the main phone number for the school.
- Physical Address*: Enter the full physical address of the school.
- State*: Select the state where the school is located from the dropdown list.
- Local Government*: Once you select a State, this dropdown will populate. Select the correct Local Government Area (LGA).
- Click Back to return to the previous step if needed.
- Click Next.
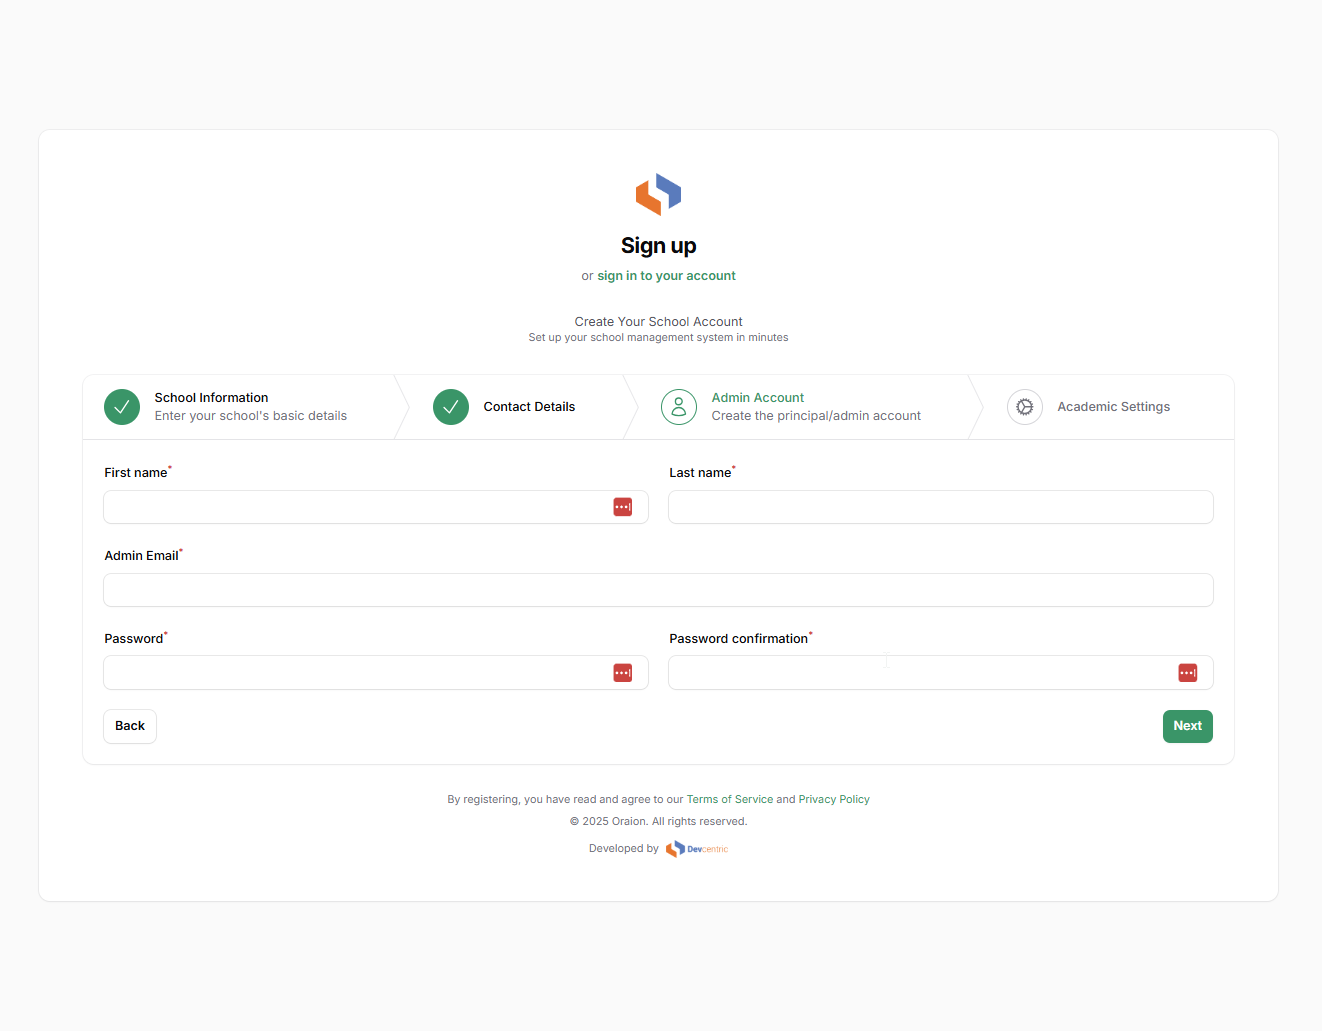
Step 3: Admin Account
Create the login credentials for the main administrator (e.g., Principal, School Owner, IT Admin). This user will have full access to manage the school account.
- First Name*: Enter the first name of the primary administrator.
- Last Name*: Enter the last name of the primary administrator.
- Admin Email*: Enter the email address for the administrator's account. This will be their login username.
- Password*: Create a strong password for the admin account.
- Password confirmation*: Re-enter the password exactly as above to confirm.
- Click Back to return to the previous step if needed.
- Click Next.
Step 4: Academic Settings
Configure initial academic structures. These can be modified later, but setting them here saves time.
- Create Classes: Toggle this ON (default) if you want Oraion to automatically create standard class structures (e.g., Nursery 1-3, Primary 1-6, JSS 1-3, SSS 1-3). Toggle OFF if you prefer to create classes manually later.
- (If Create Classes is ON) Nursery/Primary/Secondary Classes: Select the levels you want to automatically create (e.g., toggle ON Primary Classes and Secondary Classes if you are a Primary & Secondary school).
- (If Create Classes is ON) Sections per Class: Choose how many sections (arms) each class level should have by default (e.g., None, A only, A and B, A, B, and C).
- (If Create Classes is ON) Default Class Capacity: Enter the typical maximum number of students per class section.
- Subjects Setup - Create Regular Subjects: Toggle this ON (default) to automatically create a standard list of academic subjects (Math, English, Science, etc.).
- (If Create Regular Subjects is ON) Create Islamic Subjects: Toggle this ON if you also want to automatically add Islamic and Arabic subjects (Al Quran, Fiqh, Nahw, etc.).
- Terms and Policy Acceptance*: You must check the box to confirm you accept the Oraion Terms of Service and Privacy Policy. Click the links to review them.
- Click Back to return to the previous step if needed.
- Click Create School Account.

Upon clicking "Create School Account":
- Account Creation: Your school account and the primary administrator user are created.
- Automatic Setup: Standard defaults (academic session, grading scales, basic roles, etc.) are configured in the background, including classes/subjects if you enabled them.
- Login & Redirection: You will be automatically logged into your new Oraion school portal as the administrator.
IMPORTANT: Next Steps Depend on How You Registered
- Scenario A: You Registered AFTER Clicking a Plan on the Pricing Page
- If you first visited the Pricing Page, clicked "Start your subscription" (or similar) on a plan offering a free trial, and then completed the registration steps above:
- Trial Activated: Your plan's free trial (e.g., 30 days) is automatically activated upon successful registration.
- Full Access: You have immediate access to explore and use all the features included in your trial plan. Start setting up your school! You'll be taken directly to your functional Dashboard.
- If you first visited the Pricing Page, clicked "Start your subscription" (or similar) on a plan offering a free trial, and then completed the registration steps above:
- Scenario B: You Registered Directly (Without Selecting a Plan First)
- If you went straight to the Sign Up page without choosing a plan beforehand:
- Restricted Access & Redirect to Billing Page: You will be logged in, but attempting to access most features or navigate away from the initial Dashboard/prompt will automatically redirect you to the main Billing page.
- Billing Page Prompt: This page (shown below) will clearly indicate your lack of subscription. You will see:
- A message like: "You're not currently subscribed to any plan. Click 'Subscribe' below to choose a plan that fits your needs."
- A "Subscribe" button.
- Sections for "Manage Subscription" (which won't apply yet) and "Subscription History" (which will be empty).
- If you went straight to the Sign Up page without choosing a plan beforehand:
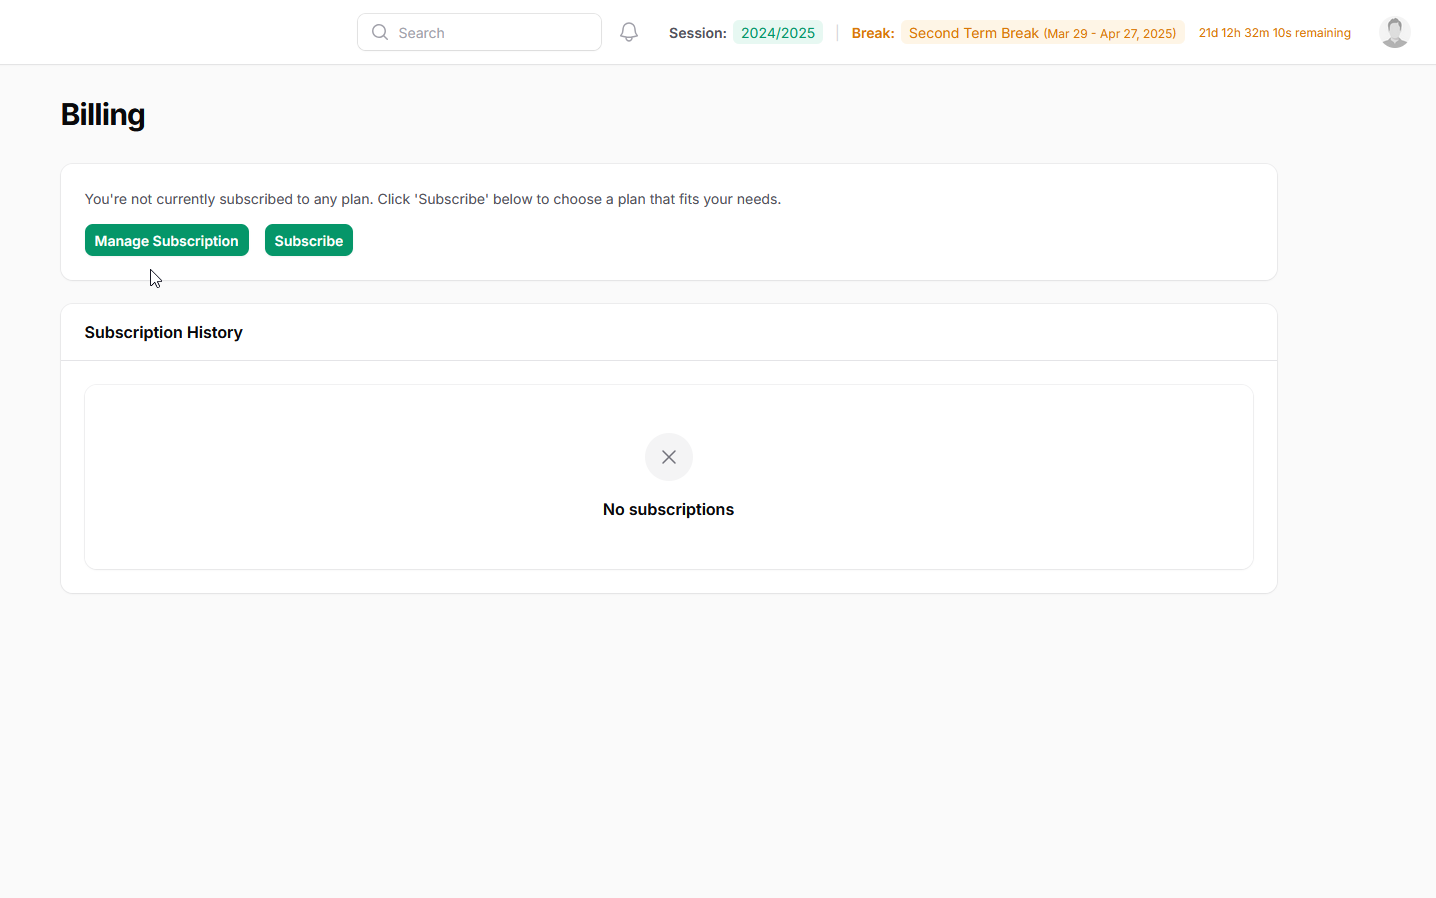
- Navigate to Pricing: Clicking the "Subscribe" button on this Billing page will take you to the main Oraion Pricing Page (displaying Basic, Standard, Premium plans).
- Select Your First Plan & Activate Trial:
- On the Pricing Page, review the plans (as described in the "Choosing and Subscribing to a Plan" documentation).
- Click "Start your subscription" (or similar) on the plan you wish to begin with.
- Because this is your first time selecting a plan after registration, the plan's associated Free Trial will be activated automatically.
- You will then be redirected back to your Dashboard with full access unlocked for the duration of your trial.
In summary: To gain full access after registering directly, you must navigate from the initial restricted state to the Billing page prompt, click "Subscribe" to go to the Pricing Page, and select your initial plan there to trigger the automatic free trial.
You can now start exploring Oraion, adding students and staff, and further configuring your school's settings according to your active trial plan!
On this page
On this page
Related Articles
Manage Your Subscription
Choosing and Subscribing to a PlanThis guide provides step-by-step instructions on how to view available subscription plans, choose the one that best...
Getting Started
Oraion School Management System: Learning Path & Documentation GuideWelcome to Oraion! This guide provides a recommended path for learning how to...
Academic Sessions & Terms
Managing Academic Sessions & TermsAcademic Sessions and Terms are fundamental structures in Oraion for organizing school activities, records, and...